When setting tag parameters, there is a difference between using UWB dongle settings and using network settings. The biggest difference is that the network setting parameters can be set in batches. Therefore, the following is divided into two parts to explain the parameters and how to let the tag enter the setting mode.
Use UWB Dongle to Set Tag Parameters
A. Double click to open Set.exe
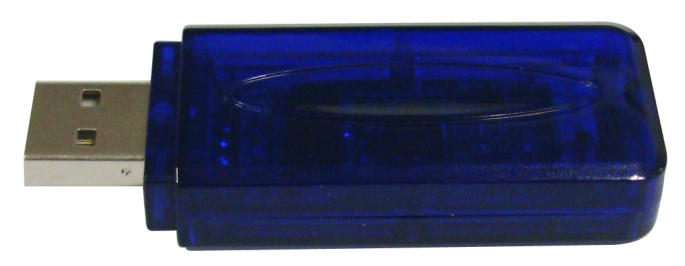
B. Open Set.exe, select Device Set, find the corresponding serial port number of the dongle, click Connect. If the corresponding serial port number can’t be find under the list, click Refresh. Then double-click the tag device in the list.

C. Click “Read” to display current setting and “Set” to apply and store the value
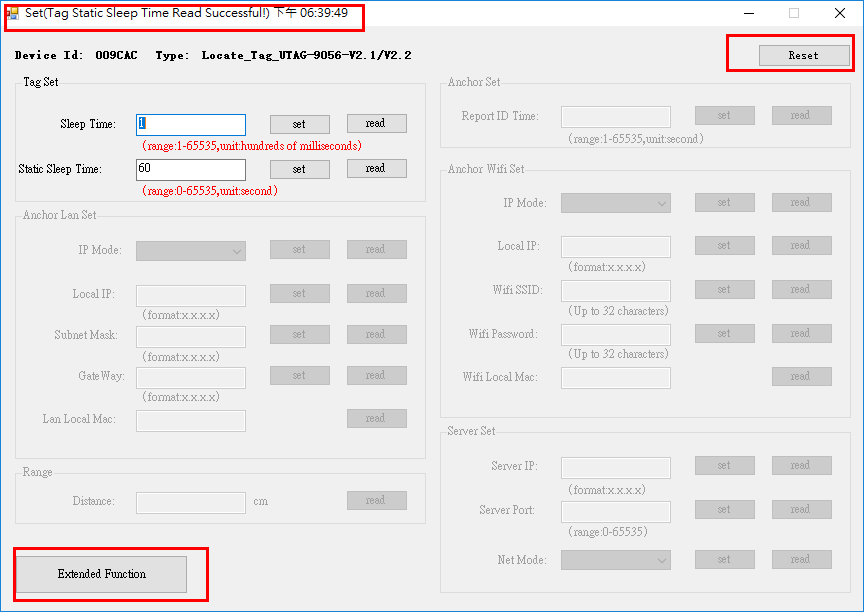
TAG Parameter Description * Status of the operation will be display at the top of the window
-Device Id: ID / device alias
-Type: Device type
-Reset: Anchor Reboot, click to apply the settings after configuring the parameters
Tag Set (TAG Setting)
-Sleep Time: Duration of the sleep time when entered sleep mode.
-Static Sleep Time: Intervals between the upload when TAG enters sleep mode.
Unit is in second, applicable range is 0 - 65535. 0 indicates to disable such function.
D. Click Extended Function to access the advanced setting menu
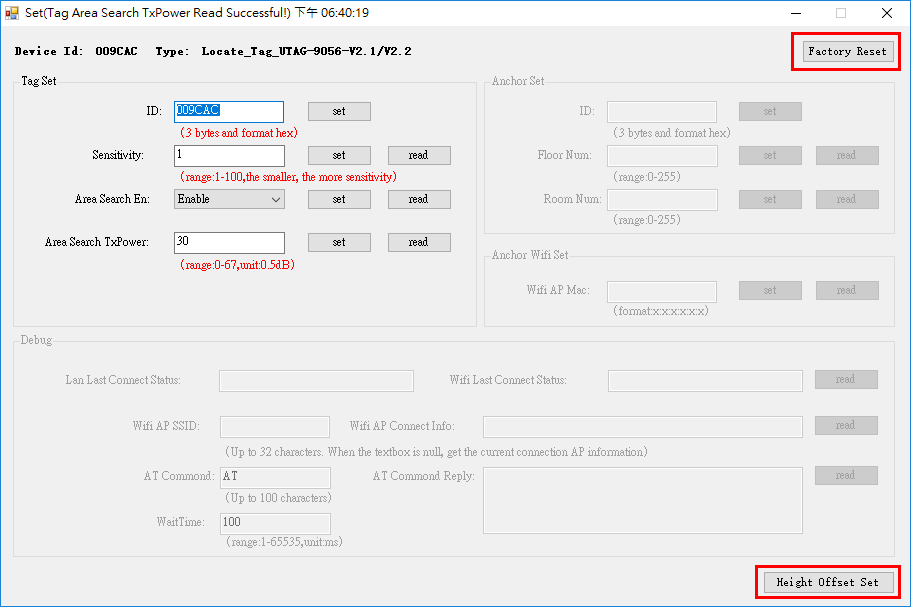
Tag Set(TAG Setting)
-ID: Anchor ID, 6 Byte, it is not recommended to modify unless needed.
-Sensitivity: TAG sensitivity setting. The lower the more sensitive, vice versa. Range 1~100
-Area Search En: Area search enable, by enabling this the TAG can now be area searched.
-Area Search TxPower: Area search enablement threshold, default value is 30
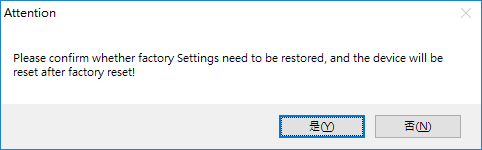
E. Factory Reset:To restore Tag parameters back to default setting. Double click and window as shown below will pop-up
F. Height Offset Set: Only available on height sensor equipped models
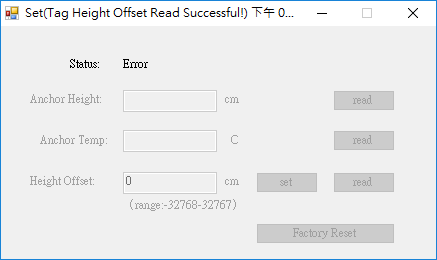
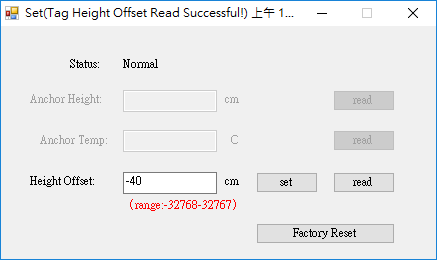
-Status: Status of height sensor module, Error indicates that height sensor does not exist
-Height Offset: Applicable offset range for the anchor, range is -32768 ~ 32767
-Factory Reset: Restore Tag height value back to default setting
Use the Network to Set Tag Parameters
This method allows user to update the parameter of the tag via anchor wirelessly, please ensure Anchor is connected to internet for ease of operation.
1. Double click setting software Set.ex
2. Navigate to the Tag Online Set menu, if any problem encountered while operating, please contact us and provide model number to check
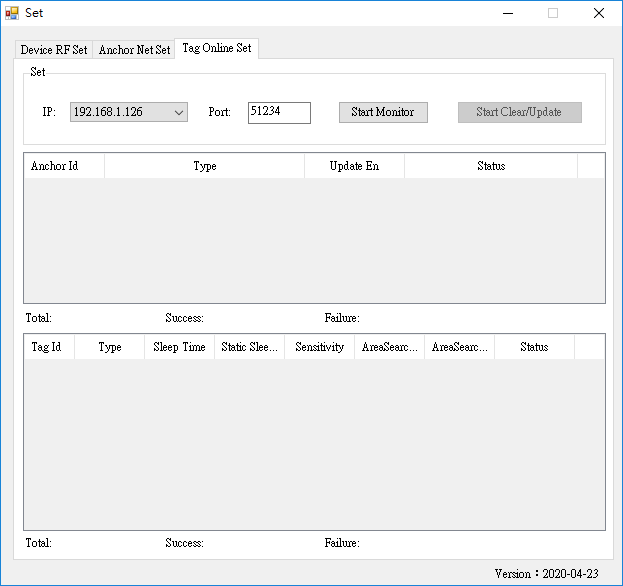
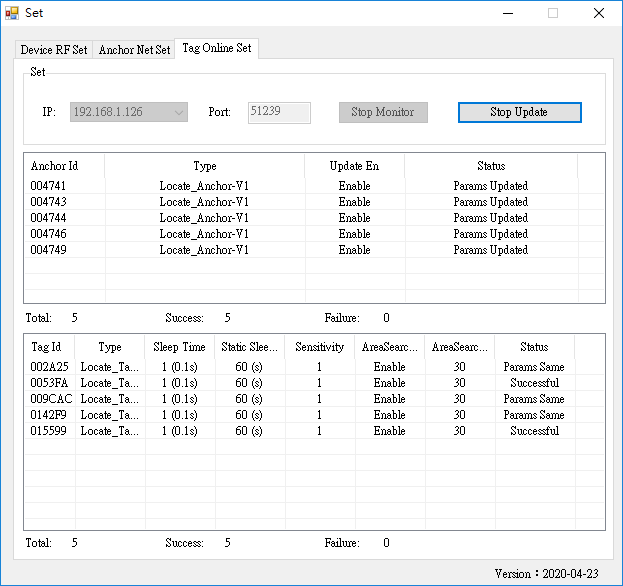
3. The IP address and communication Port needs to be identical to the Server IP and Server port in correspondence. Click Start Monitor after filling it. Once the connection has been successfully connected, a list of anchors online will be shown.
Attention: The network update for Anchors and TAGs are different. To update a TAG the anchor will have to first receive the information and broadcast it to a TAG.
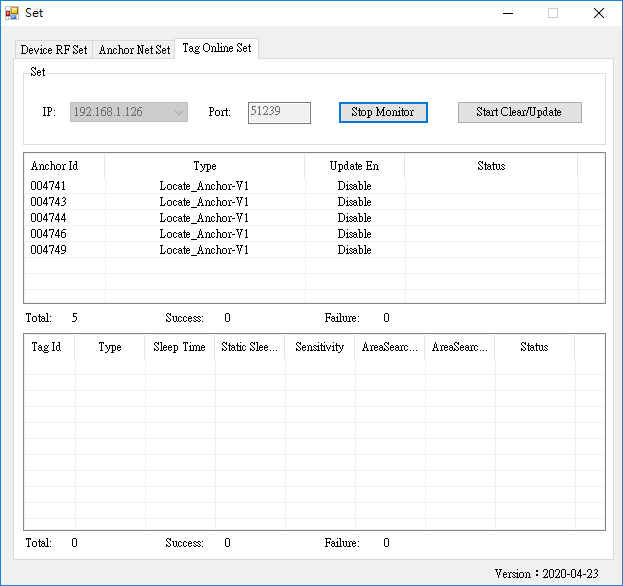
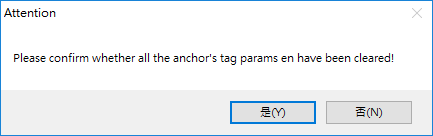
4. Click Start Clear/Update to proceed to the following windows as shown below
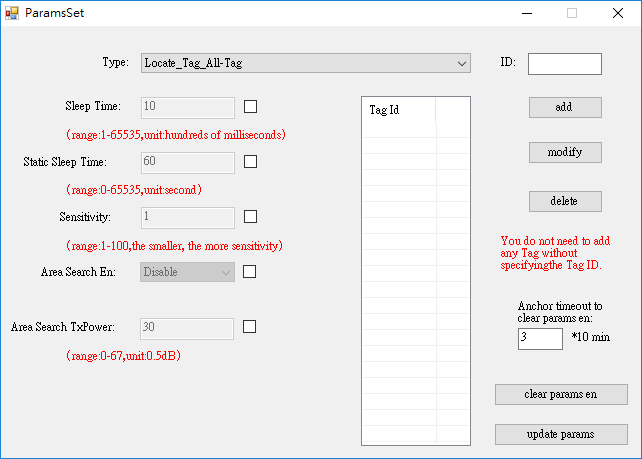
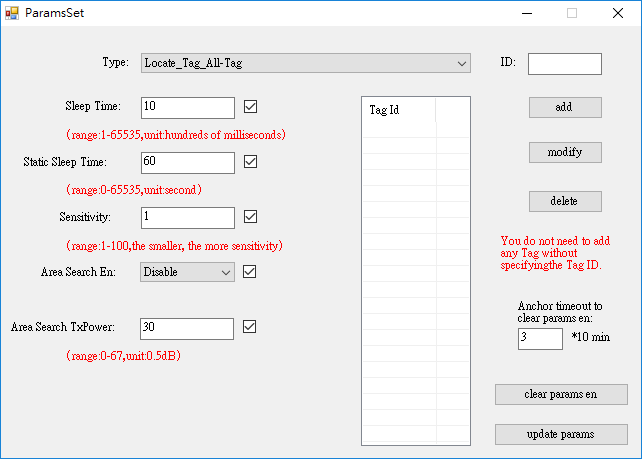
* To enable changes to the parameter, please tick the boxes
-Type: Device type
-Sleep Time: Duration of the sleep time when entered sleep mode.
-Static Sleep Time: Intervals between the upload when TAG enters sleep mode.
Unit is in second, applicable range is 0 - 65535. 0 indicates to disable such function.
-Sensitivity: TAG sensitivity setting. The lower the more sensitive, vice versa. Range 1~100
-Area Search En: Area search enable, by enabling this the TAG can now be area searched.
-Area Search TxPower: Area search enablement threshold, default value is 30
-ID:The ID or alias of the selected TAG, multiple ID entries are supported
-clear params en:Disable OTA on the anchors
-update params:Confirm and begin the OTA for TAG
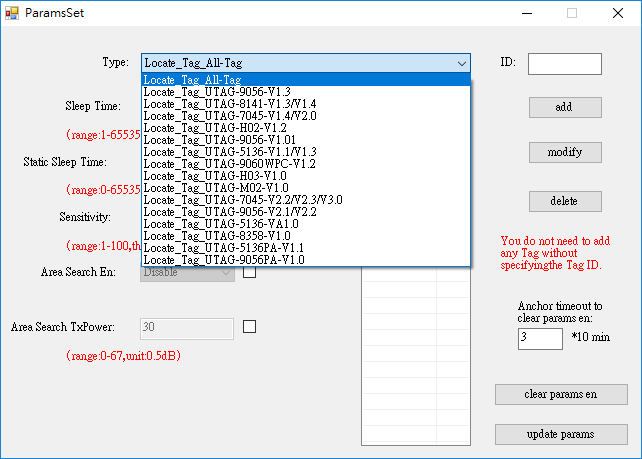
5. OTA could be used to update multiple devices at once. It could also be used to update a select model type of tag only , individual units or specific parameters on the list.
A. Tag type selection
B. Tag parameter setting
C. Appoint selected Tag ID to update
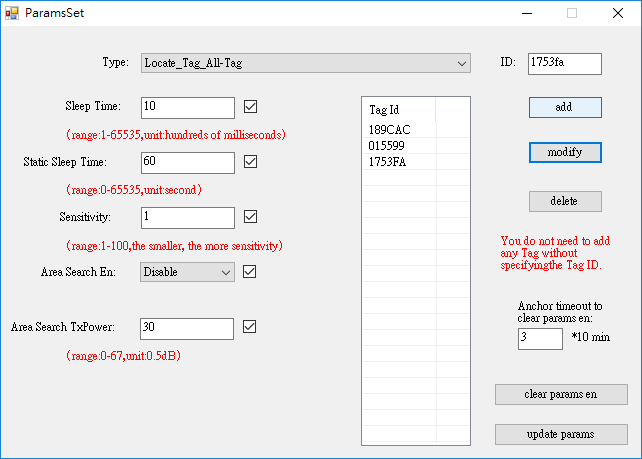
-add:To add selected Tag ID
-modify:To modify selected Tag ID
-delete:To delete selected Tag ID
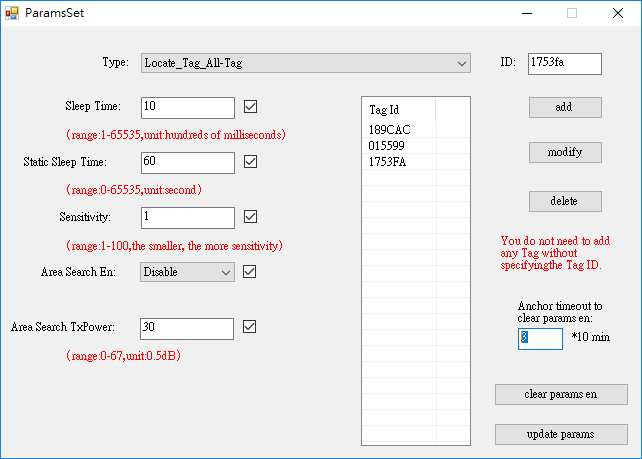
D. To avoid anchors from storing previous updates , user can create a time limitation to wipe out the update after a certain time to prevent constant TAG updates.
6. Once the updates has been confirmed and complete click update params to execute the OTA function.
7. The upper portion will display list of base station being updated and the parameter update transmission status, the lower portion shows the update condition of Tag
How to Bring Tag into Setting Mode
Note that after the Tag enters the setting mode, if the Tag does not perform the setting operation within 20 seconds, the Tag will automatically leave the setting mode. The Tag will wait one minute after each setting operation. The following describes the methods for each tag to enter the setting mode. The operation here is only for using UWB Dongle to set the tag, because the tag setting through the network is done by the tag actively asking.
Therefore, the tag does not need and cannot enter the setting mode. Tag will ask Anchor if it needs to be updated every 10-20 minutes. In addition, when the Tag device is turned on, it will first issue a parameter update query. When the user updates the Tag parameters, the Tag device can be restarted to speed up the update.
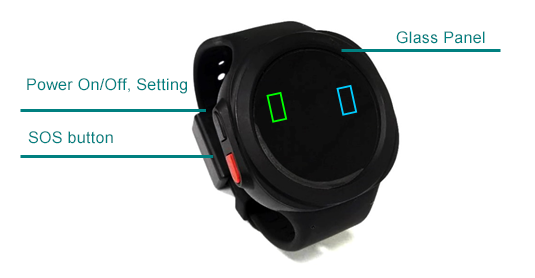
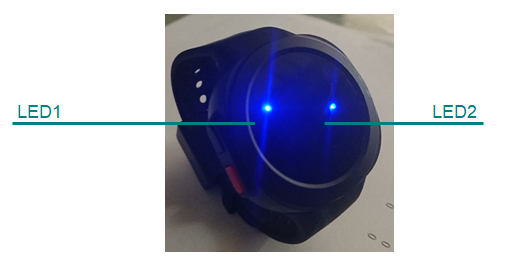
A. UTAG-9056 / UTAG-9056_PA
Setting mode steps
(1) Turn off the power switch
(2) Press the setting button
(3) Then turn on the power, Tag will enter the setting mode
(4) At this time, if LED2 is always on in blue, it means entering the setting mode. User can release the setting button
(5) Use UWB dongle to search for devices and set parameters
* In the setting mode, pressing the setting button once will leave the setting mode
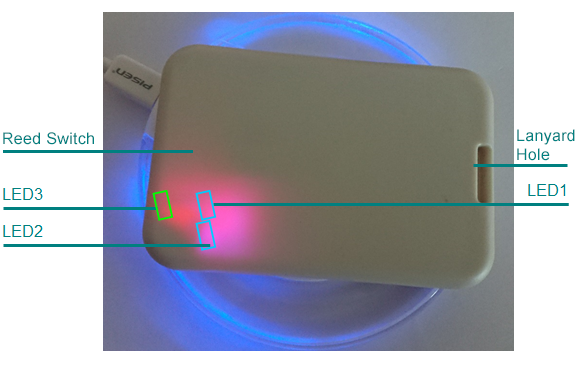
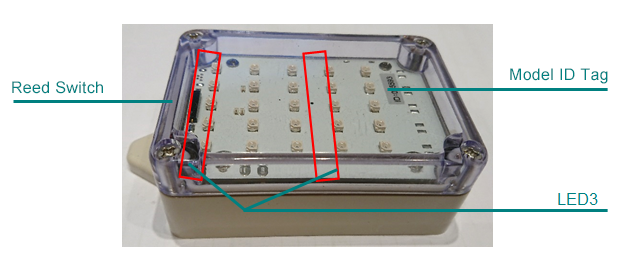
B. UTAG-7045
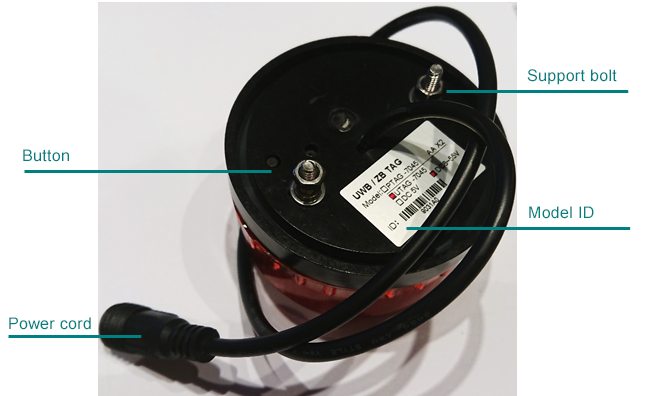
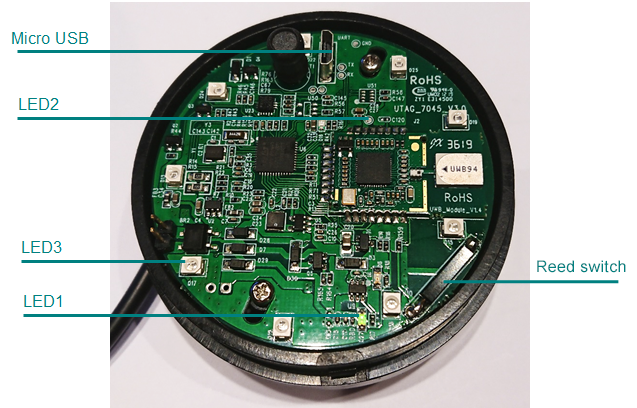
• Reed Switch:UTAG-7045 uses magnet to turn it on and off. When magnet is close to the magnetic reed switch, LED3 will light up; when magnet is moved away, it will light off.
Setting mode steps
(1) In working mode, the magnet is close to the reed switch
(2) The magnet can be removed until the LED2 is constantly on, indicating that the Tag enters the setting mode
(3) Use UWB dongle to search for devices and set parameters
* In the setting mode, if the magnet approaches T again, it will leave the setting mode
• Button: as the above-mentioned reed switch operation, but changed to hold the lower button
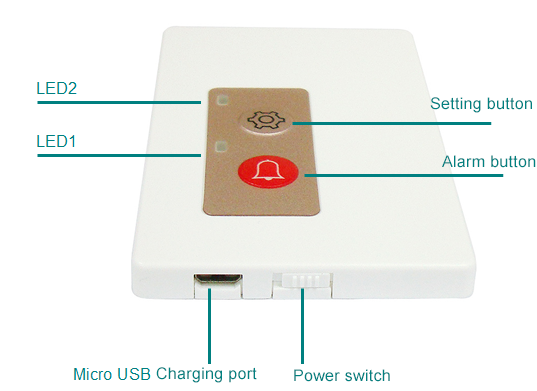
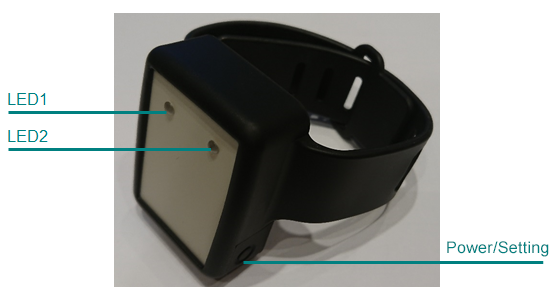
C. UTAG-8141
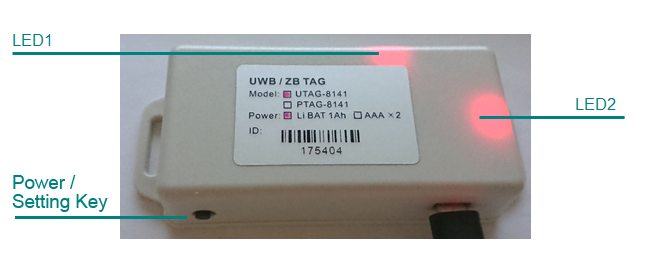
Setting mode steps
(1) In working mode, hold the pressure setting button
(2) The user can release the setting button until the LED1 are constantly on, indicating that the Tag enters the setting mode
(3) Use UWB dongle to search for devices and set parameters
*In the setting mode, pressing the setting button once will leave the setting mode
D. UTAG-5136 / UTAG-5136_PA

Setting mode steps
(1) In working mode, hold the pressure setting button
(2) The user can release the setting button until the LED1 are constantly on, indicating that the Tag enters the setting mode
(3) Use UWB dongle to search for devices and set parameters
* In the setting mode, pressing the setting button once will leave the setting mode
E. UTAG-H03
Setting mode steps
(1) In working mode, hold the pressure setting button
(2) release the setting button until the LED1 and LED2 are constantly on, indicating that the Tag enters the setting mode
(3) Use UWB dongle to search for devices and set parameters
* In the setting mode, pressing the setting button once will leave the setting mode
F. UTAG-H04
Setting mode steps
(1) In working mode, hold the pressure setting button
(2) The user can release the setting button until the LED1 is constantly on, indicating that the Tag enters the setting mode
(3) Use UWB dongle to search for devices and set parameters
* In the setting mode, pressing the setting button once will leave the setting mode
G. UTAG-9060WPC
• Reed Switch: UTAG-9060WPC uses magnet to turn it on and off. When magnet is close to the magnetic reed switch, the LED1 and LED2 will light up; when magnet is moved away, it will light off.
Setting mode steps
(1) In working mode, the magnet is close to the reed switch
(2) The magnet can be removed until the LED1 and LED2 are constantly on, indicating that the tag enters the setting mode
(3) Use UWB dongle to search for devices and set parameters
* In the setting mode, if the magnet approaches T again, it will leave the setting mode
H. UTAG-8358WPC
• Reed Switch:UTAG-8358 uses magnet to turn it on and off. When magnet is close to the magnetic reed switch, LED3 will light up; when magnet is moved away, it will light off.
Setting mode steps
(1) In working mode, the magnet is close to the reed switch
(2) The magnet can be removed until the LED1 is constantly on, indicating that the Tag enters the setting mode
(3) Use UWB dongle to search for devices and set parameters
* In the setting mode, if the magnet approaches T again, it will leave the setting mode